
When you think about desserts, especially cookies, there are many drinks that come to mind. I find that they go perfectly with cold milk or a bad day. For something different, try pairing your Arby’s Oreo Bites with a scoop of vanilla ice cream. The soft creaminess of the ice cream balances the crunchy texture of the bites.
If you’re feeling adventurous, you could even drizzle some chocolate or caramel sauce on top. These bites also work well with a hot cup of coffee, offering a delightful contrast of flavors and temperatures. The rich sweetness of the Oreo bites complements the bitter notes in coffee beautifully.

Let’s dive into a dessert that has grabbed the attention of food lovers nationwide—Arby’s Oreo Bites. I first stumbled upon these delightful treats during a casual outing and was immediately intrigued. They were presented as a fun twist on the classic milk-and-cookie experience.
Every bite was a delicate layer of creamy and chocolatey goodness. My curiosity swelled when I realized I could recreate them myself with just a few ingredients.
What are Arby’s Oreo Bites?
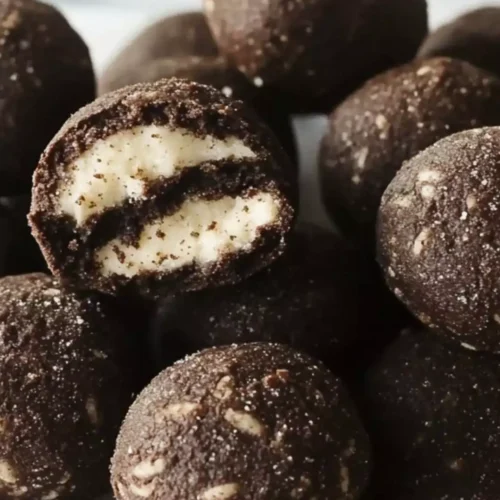
Simply put, Arby’s Oreo Bites are delectable morsels made primarily from crushed Oreos and cream cheese. These bites pack a powerful punch of flavor in a convenient, easy-to-eat form. The beauty of these treats lies not only in their simplicity but also in the enjoyable texture—a lovely mix of crunchy cookie bits and creamy filling.
Imagine sinking your teeth into one, only to be met with a rich, sweet explosion that evokes memories of childhood. Just thinking about them makes my taste buds do a happy dance!
Why This Recipe Works
This recipe excels because it combines classic flavors that everyone loves. Oreos have that nostalgic touch, while cream cheese adds a rich texture that makes these bites irresistible. You also have the option of adding a touch of vanilla extract or powdered sugar, creating even more depth of flavor.
The balance of sweet and slightly tangy makes these treats special, appealing to both the young and old alike. Plus, they are incredibly easy to prepare—no baking required. Who wouldn’t want to whip up a treat with minimal effort?
What You’ll Need to Make This Dish
To create these delightful bites, you only need a handful of ingredients. Each one adds something important to the final product. You’ll need:
- 8 oz cream cheese (1 package, softened): The cream cheese binds everything together and provides a rich texture.
- 16 oz package of Oreos (45 cookies, divided): This is the star of the show and gives these bites their signature flavor.
- 1/4 teaspoon vanilla extract (optional): A little extra flavor never hurt anyone.
- 1 tablespoon powdered sugar (optional): This helps balance the sweetness if desired.

How to Make Arby’s Oreo Bites
The preparation of Arby’s Oreo Bites is a breeze. No one would guess that such a delightful and indulgent treat could come together so quickly. In a few simple steps, you’ll have a dish that is both eye-catching and delicious.
Step-by-Step Instructions
Step 1: Gather Ingredients
Before you dive into the cooking process, ensure all your ingredients are at hand. This reduces stress and makes the experience smoother. Grab your Oreos, cream cheese, vanilla extract, and powdered sugar. There’s nothing worse than starting a recipe and realizing you’re missing something.
Step 2: Crush the Oreos
Using a food processor or simply a sturdy zip-top bag, crush 30 Oreos into fine crumbs. These will form the base and texture for your bites. If you use a bag, it’s a great chance to relieve some stress—give those cookies a good whack! Reserve 15 whole Oreos for later, which will add an appealing garnish to your bites.
Step 3: Mix Ingredients
In a bowl, combine the softened cream cheese, crushed Oreos, and optional vanilla extract. Mix well using a spoon or a hand mixer. You want to ensure that every crumb is coated in that rich cream cheese. The mixture should be thick but still manageable.
Step 4: Shape the Bites
Once the mixture is nice and combined, it’s time to form the bites. Take a small scoop of the Oreo mixture and roll it into a ball. Repeat this step until the mixture is used up. You can make them any size you prefer, but I recommend just a bit larger than a marble.
Step 5: Chill
After shaping the bites, place them on a baking sheet lined with parchment paper. Pop them into the fridge for about 30 minutes to an hour. Chilling will help them firm up and make them easier to handle. You don’t want mushy bites!
Step 6: Coat with Chocolate (Optional)
While your bites are chilling, you can melt the remaining Oreos or chocolate if you’d like a chocolate coating. Once the bites are firm, dip them into the melted mixture and set them back on the parchment for an ooey-gooey finish.
Step 7: Serve and Enjoy
After the bites have cooled and set, they are ready to serve! Whether for a party or just a quiet evening treat, you will be the star of the show.
Tips for Perfect Arby’s Oreo Bites
Here are some pointers to help you elevate your Arby’s Oreo Bites:
- Use room-temperature cream cheese: This ensures better mixing. Cold cream cheese can lead to lumps and uneven texture.
- Keep the crumbs small: The finer the Oreo crumbs, the better the bites hold together.
- Experiment with flavors: Don’t hesitate to add in different extracts, like mint or peppermint, for a seasonal twist.
- Make them bite-sized: Keep the size small to encourage popping them in your mouth. This helps maintain portion control.
- Chill before serving: Letting them set in the fridge not only firms them up but also makes them easier to enjoy without falling apart.
How to Store Leftovers
Storing your leftover Arby’s Oreo Bites is simple. Place them in an airtight container and keep them in the refrigerator. They should stay fresh for up to a week. If you want to keep them longer, you can freeze them.
Just ensure they are well-wrapped to prevent freezer burn. When ready to eat, let them thaw for a few minutes.

Nutrition Information
Understanding your nutrition can help you enjoy these bites without guilt. Each bite has about 100 calories, depending on size.
They also contain 7g of fat, 10g of carbohydrates, and 1g of protein. Remember that moderation is essential, especially with treats this delicious!
How Would I Recommend Serving Arby’s Oreo Bites?
- On a Dessert Platter: These bites make for an impressive presentation on any dessert table. Pair them with assorted mini desserts for variety.
- With Fresh Berries: Fresh fruit offers a tangy contrast to the sweetness of the bites. Strawberries or raspberries could be an excellent addition.
- At a Kid’s Party: Kids will love these bites! They are suitable for birthday parties and playful gatherings. Serve them with colorful paper plates for added fun.
- As a Cozy Evening Treat: For a quiet night in, enjoy the bites with a warm cup of tea or hot chocolate. It’s a delightful way to unwind after a long day.
What Alternatives Can You Use for Ingredients If Not Available?
Sometimes you might find yourself lacking some ingredients. No problem—here are some substitutes:
- Mascarpone Cheese Instead of Cream Cheese: You can achieve a leveled richness with mascarpone. It’s creamier and offers a delightful flavor.
- Gluten-Free Oreos: If you’re gluten intolerant, look for gluten-free Oreo varieties. They provide the same flavor without any of the concerns.
- Greek Yogurt Instead of Cream Cheese: This is a healthier alternative that still gives that creamy texture, but may not be as sweet. Adjust sugar levels accordingly.
- Coconut Cream Instead of Cream Cheese: For a completely dairy-free option, coconut cream works well. It creates a tropical twist that pairs well with chocolate.
Arby’s Oreo Bites Recipe
Equipment
- zip-top bag
Ingredients
- 8 oz cream cheese 1 package, softened
- 16 oz package of Oreos 45 cookies, divided
- 1/4 teaspoon vanilla extract optional, for extra richness
- 1 tablespoon powdered sugar optional, to balance the sweetness
Instructions
- Before you dive into the cooking process, ensure all your ingredients are at hand. This reduces stress and makes the experience smoother. Grab your Oreos, cream cheese, vanilla extract, and powdered sugar. There’s nothing worse than starting a recipe and realizing you’re missing something.
- Using a food processor or simply a sturdy zip-top bag, crush 30 Oreos into fine crumbs. These will form the base and texture for your bites. If you use a bag, it’s a great chance to relieve some stress—give those cookies a good whack! Reserve 15 whole Oreos for later, which will add an appealing garnish to your bites.
- In a bowl, combine the softened cream cheese, crushed Oreos, and optional vanilla extract. Mix well using a spoon or a hand mixer. You want to ensure that every crumb is coated in that rich cream cheese. The mixture should be thick but still manageable.
- Once the mixture is nice and combined, it’s time to form the bites. Take a small scoop of the Oreo mixture and roll it into a ball. Repeat this step until the mixture is used up. You can make them any size you prefer, but I recommend just a bit larger than a marble.
- After shaping the bites, place them on a baking sheet lined with parchment paper. Pop them into the fridge for about 30 minutes to an hour. Chilling will help them firm up and make them easier to handle. You don’t want mushy bites!
- While your bites are chilling, you can melt the remaining Oreos or chocolate if you’d like a chocolate coating. Once the bites are firm, dip them into the melted mixture and set them back on the parchment for an ooey-gooey finish.
- After the bites have cooled and set, they are ready to serve! Whether for a party or just a quiet evening treat, you will be the star of the show.
Notes
- Use room-temperature cream cheese: This ensures better mixing. Cold cream cheese can lead to lumps and uneven texture.
- Keep the crumbs small: The finer the Oreo crumbs, the better the bites hold together.
- Experiment with flavors: Don’t hesitate to add in different extracts, like mint or peppermint, for a seasonal twist.
- Make them bite-sized: Keep the size small to encourage popping them in your mouth. This helps maintain portion control.
- Chill before serving: Letting them set in the fridge not only firms them up but also makes them easier to enjoy without falling apart.
Nutrition
Frequently Asked Questions
Conclusion
Arby’s Oreo Bites are a delightful treat that can be easily made at home. With just a few key ingredients, you can recreate the satisfaction of this sweet morsel. Whether you serve them at a gathering, as a family treat, or just because, they are bound to please.
The recipe is simple enough for anyone, even those who claim they can’t cook. As you explore this culinary endeavor, remember to experiment and make it your own.
In short, the blend of creamy and crunchy never gets old, and these bites will surely have you coming back for more. So gather your ingredients and get ready to treat yourself—you deserve it!
